STOP RIGHT HERE!
HUGE NEWS FOR EVERYONE WHO LOVES A CONTEST!
Kris here, but before we get to this week's challenge I'm going to turn this over to the lovely Nikky and she's going to tell you about our MEGA contest. You're not going to
want to miss this because...well because...oh Nikky, just tell them!
"Well, what an entrance, feel like Royalty now LOL!!
Ok, here we go...hang onto your pants girls and boys,
we have a MEGA competition for you and even MEGA-er-er prizes!!
For the past few months I've been working very closely with
Letraset who are the clever people behind the fabulously lush
Promarker brand and have been doing some product testing etc for them. Now, this month, hot off the press, Letraset are relaunching their fabulous
AQUAMARKER brand
which are basically a WATERCOLOURING marker pen unlike any other I've used.
Aquamarkers have been available for years but in the past they have generally been used by Artists and professional Graphic Designers etc. BUT now we crafters have discovered them Letraset have listened to what we're asking for and are now adding a further 20 colours to the brand which takes the range up to 40 fantastic colours, BUT as they are watercolours you basically can mix any number of colours and shades you want to achieve the massive gamut of 256million squillion colours! Well, ok maybe not quite 256 million squillion, but not far off!
As I've had my hands on the only set of n

ew colours in the UK other than a set in Letraset HQ I've had time to play a little the last couple of weeks, so, I have managed to twist the Marketing Director's arm very hard and he has kindly agreed to donate a
FULL SET OF NEW AQUAMARKERS (40 pens, RRP £79.99) to the winner of our fabulous competition!
In addition there will also be some
runner up prizes of smaller packs of Aquamarkers too, so a fantastic chance to win for everyone!
Sooooo...you want to know what you gotta do don't you?WELL, basically we all LOVE colouring in don't we...so we thought we would make this a colouring competition so ANYONE can have a go! We want you to
make a card, scrapbook page or any other papercrafting project where you have used a colouring technique - this can be either watercolours or you can use your Promarkers, Sakura pens, Prisma's, watercolour pencils etc, basically any type of medium that gives you a watercolour-type effect.
Now, don't forget this is open to anyone who just loves to colour so don't think that you will only be in with a chance if you're the world's best watercolouring expert - the winning entry could be someone who shows promise and if we think that person could improve their technique massively if they had great products, it could be anyone! So come on, have a go, we want to see your fabulous creations!!
The closing date for entries is 12:00 gmt on Sunday 29th August, so you have LOTS of time to enter and get some practice in! In the meantime,
make sure you check back here every Friday as each week until the closing date I will be doing a mini tutorial step by step to show you some techniques using both Promarkers AND Aquamarkers.
IMPORTANT! TO ENTER: YOU MUST INSERT A LINK TO YOUR ENTRY (the picture, NOT your blog) IN THE COMMENTS SECTION OF THIS POST (or any subsequent posts until the closing date) IF YOU DO NOT POST YOUR LINK IN THE COMMENTS YOUR ENTRY WILL NOT BE CONSIDERED, THIS IS REALLY IMPORTANT SO YOUR COMPETITION ENTRY DOES NOT GET CONFUSED WITH THE CHALLENGE ENTRIES ON THE BLOG. PLEASE DO NOT ENTER YOUR LINK VIA THE INLINKZ WIDGET!The Judges decision is final. Entries will be judged after the closing date and the winners will be announced on the blog (details to follow)
SO make sure you check in here next Friday for the next tutorial - we can't wait to see all those entries!Ok, let's get started with this week's tutorial...here I'm using the fabulous Aquamarkers and one of the Polkadoodles brand new rubber stamp designs which you can get here...I hope you find this tutorial helpful and hope it inspires you to have a go at some colouring...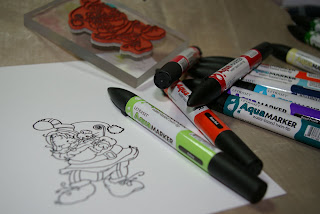 |
| Aquamarkers are waterbased so I've used Stazon solvent based ink to stamp my image so it doesnt run when it gets wet. I'm going to use a mixture of normal paintbrushes and a waterbrush pen. |
Aquamarkers are double ended - you have a chunky brush end for making fantastic washes and applying heavy coverage but you can also use the thinner tip for fine detailed work as well...
I'm starting by working some colour onto my non stick mat (or use an acrylic block, acetate, plastic etc) so I can pick up the colour and work some water into the pigment.
I'm using my waterbrush pen initially to pick up the colour from the mat and apply it onto the image - I work from the outside of a section into the middle as I want greater depth of colour around the edges. Because I'm using the waterbrush the pigment colour is becoming diluted so I'm getting a very light colour - great for blending but as this is Santa I need a lovely deep red instead...

So now I've swapped over to a dry-ish paintbrush and I'm adding colour to the brush direct from the pen itself - this means I'm not diluting the colour at all. Many pens would start to lose the colour on the nib doing this but the Aquamarkers are so rich in pigment they allow me to do this time and again without any loss of colour (if they do fade at the nib turn them on their end to allow the colour to flood back to the point - also, quick note - you should store your Aquamarkers and Promarkers on their side because they're double-ended). You can see how much deeper the colour is now as I'm adding it to the image.
Keep blending the colour, if your brush becomes too dry add more water - here I've gone back to my waterbrush to blend the colour better and add some moisture.
You can also use the pen direct onto the paper to add a really rich swoosh of pigment to your image. This works especially well on a cartridge paper, in the tutorial I am only using a standard piece of smooth card.
Don't forget you can layer your colours with Aquamarkers, just like normal watercolour mediums.
Now I've added additional colour with green and blended to add some shading and highlight.
Now I'm using the fine nib to apply colour directly to the hat.
And now as I need a paler tone for the skin I've gone back to my waterbrush pen to thin the colour for the face. I will layer the colours to add extra colour to the cheeks and nose. Again, to get shading and a depth of colour, make the outside edges of each section of the image slightly darker by adding additional colour or by blending from the middle outwards so colour "pools" to the edge. See in the image below how I coloured the mouse's face...
...and now I'm blending his face from the centre outwards, just by adding water to thin the pigment...
(you can re-wet an area which has completely dried and work it again, even if it's been dry for days)
Now I'm using a pale blue to add colour around the edges of his beard, and the fur on his outfit - adding a pale blue to a white image gives the illusion of coldness, ie snow or ice...
Now, to give my character even more depth, I'm also adding the pale blue around the outside of the whole image, wetting it again with my waterbrush as I go round to blend it slightly. This makes the character look as if he is standing proud of the page by giving him a slight shadow on the paper. Again, the blue gives a "cold" feel to the image so it makes him look like he's in a snowy environment. You can use the same technique with a pale pink to give an idea of a "warm" environment or yellow for sunshine etc.
And finally, our finished image (excuse colour on this pic, photo came out a bit naff and doesnt show the same richness but it is the same image throughout!) - note how the shading and blending have really given it a realistic and more artistic look.
My final finishing touch is to use a fine white pen (Sakura souffle is my favourite) and I've added fine lines as highlights where the light would touch the image. Again, this gives the image a real depth and just adds a finishing touch - don't go too mad with this though, less is more!
So, this is the first tutorial - I really hope you've found this useful and that I've given you some useful tips. Don't forget to join me next Friday for the 2nd one!
Right, I'm handing back over to the lovely Kris for this week's challenge!...
Before we get into the details of this week's challenge we need to announce the winners of En's Summer Challenge. They are:
As always, please
contact Nikky for your blinkies. We'd like to thank each and everyone who participated because we LOVE to see your fabulous creations!
Now the contest is exciting, BUT! we also have our weekly challenge and I don't think I'll get too many groans for this. We all get tired of making Christmas cards long before the actual day but I think that's why we have
CHRISTMAS in JULY! If you haven't seen the wonderful new
Creative Christmas CD (Paper Boutique Vol II) then prepare to be inspired and we've all had samples to play with from the lovely new
Stamp Doodles range of rubber stamps which were launched at the Doncaster Summer Crafting show last weekend - over 50 brand new designs to choose from! The design team has done a super job as always and I think you'll want to join in.
There are no real guidelines this week - just make a Christmas card. We look forward to having you share your cards with us. Deadline for entries is 12noon GMT on Sunday 1 August and please link your creation via the widget at the foot of this post. Good luck!
For my card I used the wonderful wreath template from the new
Creative Christmas CD. You can make a shaped card with this or use the wreath with sentiment as a topper as I did. I did cut all of the leaf layers and as Nikky says on the CD she made them as easy to cut as possible. My backing papers are from the
Jingle Jangle CD (from last Christmas) and I added a little birdy from the Candy Doodles CD that I colored with Prismas and OMS.

Brenda I made a stepper card, cut three different sizes fairies from the new
Paper Boutique Christmas CD, added lots of glitter, stamped sentiment from the Christmas stamp set and a border punched from Martha Stewart embossed snowflakes.
 Lou
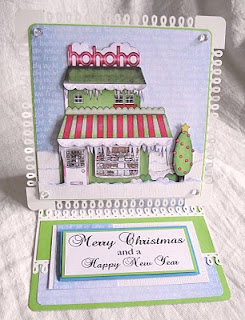
Lou: I have made an easel card using the fabaroo NEW "Creative Christmas" CD - Paper Boutique 2. The image, Candy Shop, has been layered up several times and I have bravely (gulp) used glitter to ass highlights to the snow. I say bravely as I am not a glitter girl I'm afraid. The backing papers and sentiment are also on the CD too.
 Nettie
: For my card this week I have made a side stepper card using the new
CD Paper Boutique 2. I printed the Poinsetta flower templates onto some of the CD's red papers and layered up.
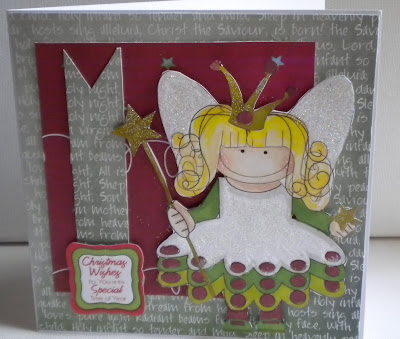
Enfys - I used the Polly fairy from the new and gorgeous
Christmas templates Cd, the paper is from the same CD. Polly was given rather a hefty glittering, and her crown and wand were coloured using the gold Promarker pen.
Lisa - I used the Stamp Doodles image of the little
Christmas Cottage and Trees for my card this week and the sentiment is from the
Christmas Doodles Rubber Stamp Plate. I added some sparkle to the card with some snowflake sprinkles. This little house is just ALL FULL OF CUTE!!
Fliss - I chose to make a tent shape card and printed out 2 colour variations of the lovely snowflake paper from the new
Paper Boutique 2 Creative Christmas CD on both sides of the card. I cut an oval shape from the front and turned this over to the contrast side and added a cut out cute penguin from the CD. I then glittered some of the darker snowflake paper and punched out some snowflakes to embellish the card. I added a greeting from the CD to finish.
Tracy This
Poinsettia is from the NEW Stamp Doodles range. I stamped it three times and cut it out and layered it up after glittering around the edges. The backing paper is from the NEW
Paper Boutique 2 - Creative Christmas, the sentiment and holly is from
Christmas Doodles stamp set.
Claire I have created a small easel card using the fab
Stamp Doodles doodly tree which is then coloured with Promarkers. I also stamped and coloured some shrink plastic for my mini trees. The background paper and sentiment used is from the new
Paper Boutique cd - Creative Christmas. Silver Promarker to doodle.
Jenny This week I challenged myself to use up some leftover bits and pieces. I've made a mini festive mantelpiece with leftover pieces from the Fireplace decoupage on the
Creative Christmas CD. The mini cards, soldier garland and bow garland were all made from cut out pieces of patterned paper from the same CD. All that was needed then was some bling!
Dee: I've used one of the new
Polka Doodles rubber stamps as the main focal point of my Christmas Card. I really love this jolly Santa and mouse image. You just have to look at them and you can't help smiling. I used backing papers and a border strip from
Jingle Jangles cd. I also used a gold promarker pen round the shaped elements of the card to highlight them.
Tracie: I used one of the new
Stamp Doodles and some papers from
Creative Christmas to make a Tri fold card.
Ruth: I've used the Sleigh shaped card from
Paper Boutique Vol 2 - Creative Christmas - cut out all the elements and then layered it up how I wanted. A bit of glitter glue here and there and a gem too - it's a Christmas card after all! The back of the card uses a paper from the same cd. I think I'll be making a lot more of these!!

Please link up your creation with the widget at the end of this post and the deadline is 12noon GMT on Sunday 1 August. Good luck!
*****


 If you missed all the info and excitement last week, you can see it here, we have teamed up with Letraset to give away a full set of 40 Aquamarker watercolour pens (RRP £79.99) to the winner of our great competition. All you have to do is make a card or project which you've COLOURED IN - now you can use watercolours, Promarkers, Copics, Prisma's, felt tips, pastels, acrylics, whatever the heck you want as long as you show us your colouring skills! The winner will NOT necessarily be the best artist in the world, we want this to be open to everyone of all abilities so quite simply, the one we like best will win, regardless of ability or age! We also have some fabulous runners-up prizes of smaller packs of Aquamarkers too, so come on, get cracking, you have until the end of August to enter. You MUST leave a link to your project in the COMMENTS section (not InLinkz) under this post before the deadline. See full details here.


